
Visual Contrast
Check whether logos, small text and fine graphics remain clear on the selected paper or fabric. Compare ink, foil and spot finishes against the base color.
22 Years of Expertise in Custom Labels & Packaging
Explore print, foil, relief and surface finishing techniques for custom hang tags, garment labels and branded packaging. Compare their visual effects, artwork requirements and product suitability before selecting a finish.

Finishing should enhance the artwork and suit the material—not overpower the message. Consider viewing distance, touch, contrast and the space available for each treatment.
Check whether logos, small text and fine graphics remain clear on the selected paper or fabric. Compare ink, foil and spot finishes against the base color.
Consider how embossing, debossing, lamination and other surface finishes affect the feel of a label or hang tag. Review the texture using physical samples.
Review line widths, small lettering and spacing before confirming a finishing method. Fine artwork may need adjustments for foil stamping, spot UV or embossing.
Consider how the chosen finish performs during folding, handling and attachment. Match the treatment to the intended use of hang tags, labels or packaging.
From plate-free digital printing to spot colors and CMYK, see how each process builds color and what to check before production.

Digital printing works directly from prepared artwork without a conventional printing plate, making it well suited to short runs, changing designs and personalized jobs.

Spot-color printing applies individually prepared inks rather than building every color from CMYK, helping reproduce specified brand hues with greater consistency.

One ink prints a single color across text, line work or uncomplicated imagery. It is straightforward and economical but cannot recreate a full-color photograph.

Two chosen inks, shown here as cyan and magenta, print in separate passes or overprints to expand visual range beyond a single color.

Cyan, magenta and yellow combine to create many additional hues and layered effects. Without black ink, some deep tones and fine neutral details remain limited.

CMYK combines cyan, magenta, yellow and black to reproduce detailed images, gradients and rich multi-color artwork with controlled print separations.
Illustrative visual examples. Actual results depend on the approved materials, inks and production proof.
Ink behavior, substrate preparation and image reproduction influence the result before decorative finishing begins. Avoid specifying a method by name alone without reviewing the material and print requirements.
Supply approved brand colors and identify important differences between printed surfaces.
Review small text, thin lines, overlapping colors and alignment requirements.
Match the printing method to the selected paper, fabric or packaging construction.

A finish can be paired with another treatment when the material, artwork and manufacturing sequence allow it. Review the interaction rather than assuming every combination is possible.

Combine metallic foil stamping with raised embossing to highlight selected logos and decorative details. Check foil placement, relief depth and registration against the chosen paper stock.

Combine printed graphics with selective spot UV coating to create contrast between matte and glossy areas. Review coating boundaries, fine details and alignment on custom hang tags or packaging.

Pair printed information with recessed debossed details to create a subtle tactile finish. Check artwork spacing, impression depth and material suitability during sampling and production.

Finishing is also structural. Cutting paths, hole positions and crease lines determine how a printed item is handled, attached and assembled.
Define finished shape, corners, apertures and separation between cut edges and artwork.
Allow for folds, grain direction and the effect of surface treatments at creases.
Position string or fastener holes with appropriate clearance from important print and structural features.
A useful comparison weighs more than visual appeal. Identify how each treatment affects readability, touch, surfaces and production complexity.
| Treatment | Visual effect | Typical use | Buyer evaluation |
|---|---|---|---|
 Printed Colour | Color and graphic detail | Text-heavy tags and design graphics | Text size, ink and substrate |
 Hot Foil | Reflective or pigment accent | Selected premium branding elements | Foil area, lines and registration |
 Embossing | Raised texture | Symbols, monograms and selected logos | Relief, board thickness and back impression |
 Debossing | Recessed texture | Understated mark making | Depth, positioning and fine detail |
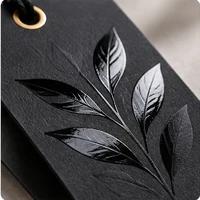 Spot UV | Localized gloss | Spot emphasis over print | Coating compatibility and alignment |
 Lamination | Overall film surface | Printed tags, bags and boxes as appropriate | Creases, edge behavior and finish |
 Die Cutting | Custom shapes and clean-cut contours | Round, irregular and custom-shaped hang tags | Shape accuracy, edge quality and material suitability |
 Hole Punching | Clean, precisely positioned holes | Hang tags with different hole sizes, positions and string attachments | Hole diameter, placement accuracy and tear resistance |
Technical artwork should clearly separate printed information from foil areas, relief tooling, spot coatings and cut paths. Exact tolerances vary by substrate, artwork and process.
Supply clearly identified layers or references for each required treatment.
Show finish zones, intended dimensions and their relationship to final cut lines.
Provide color references, foil appearance notes and any priority matching requirements.
Flag small type, fine lines and reverse artwork for technical review.

A concise technical brief helps clarify feasibility, sampling needs and costs for the selected product.
Identify whether the project involves custom hang tags, paper shopping bags, packaging boxes or compatible garment labels. Describe how the finished item will be used so suitable production and finishing options can be reviewed.
Share the latest approved vector artwork when available, including logo files, typography and separate foil, spot UV, embossing or die-cut layers. Highlight details that must remain aligned and legible.
Specify the preferred paper, paperboard or other compatible substrate, including texture, color and thickness requirements. If the material is undecided, provide a reference sample for technical review.
List the finishing effects you want to evaluate, such as printing, hot foil stamping, embossing, debossing, spot UV or lamination. Identify priority design areas and any planned combination of treatments.
Provide finished width and height, fold or crease positions, punched holes and clearance around important printed details. Include a dieline or dimensioned reference when available to support technical checks.
Estimate the order quantity and number of designs, sizes or color variations. Mention planned repeat orders or sampling needs so manufacturing options and a project-specific quotation can be discussed.
Practical answers for apparel brands reviewing decorative printing and finishing options.
Have more questions? Visit all FAQsEmbossing creates a raised design, while debossing presses the design into the material to create a recessed effect. Both techniques add texture and depth to hang tags, packaging boxes and other paper products. The final result depends on the paper thickness, material structure, tooling and artwork details.
Hot foil stamping is commonly used on suitable coated paper, uncoated paper, cardstock and packaging board. The result depends on the surface texture, coating, foil type and application conditions. We can review your selected material and artwork to determine suitable foil stamping options before production.
Yes. Foil stamping and embossing can be combined to create raised metallic effects on suitable paper and packaging materials. The feasibility depends on material thickness, design details, tooling and alignment accuracy. We recommend reviewing the artwork and confirming the effect through sampling before bulk production.
Spot UV applies a glossy coating to selected areas of a design, creating contrast against the surrounding surface. Lamination generally covers a larger surface with a protective film, available in finishes such as matte or gloss. The best option depends on the desired appearance, texture, material and product application. Availability and compatibility should be confirmed for each project.
Important details include line thickness, text size, spacing, design placement and the distance from cutting or folding lines. For foil stamping, embossing or spot UV, the required finishing areas should be clearly identified in the artwork, preferably on separate layers. Minimum feature sizes and production tolerances should be confirmed before sampling.
Please provide your product type, finished dimensions, artwork or reference images, preferred materials, desired printing and finishing effects, estimated quantities and delivery destination. If you are unsure which process is suitable, our team can recommend options based on your design, appearance requirements and budget. Pricing and production lead times will be confirmed after reviewing the specifications.
START YOUR CUSTOM PROJECT
Share your artwork, product type and preferred visual effects with QTTAG. We can discuss suitable printing and finishing options for your custom hang tags, labels and packaging.